Monday, March 31, 2014

Chasing the light for spring wildflowers, using diffuse light to highlight color.

Spring is the season for those delicate ephemeral wildflowers and one of the most spectacular things about this time of the year is the bright colors the flowers bring to life.  How do you emphasize these colors?  The answer is to photograph using the correct type of light.  In previous posts I have discussed the use and manipulation of spectacular light and this time I will cover the soft, even, mellow light we call diffuse light that occurs before sunrise or after sunset, in the shade or on overcast days.  Think of it this way, spectacular light comes from a light bulb and we use a shade over the light bulb to even out the harshness and shadows and evenly light the entire area.  I often use this analogy about using light for flowers.  When you want to feature textures and strong bold features we use and manipulate spectacular light which we often do when photographing men (think Marlboro Man here).  However, when photographing women (and flowers are often given feminine stature) we do not want to emphasize those strong features and use diffuse light, bounced light, or something that reduces contrast, shadows and allows for the natural beauty to shine through.  This type of light also intensifies the color saturation with less contrast.  There are several ways to access this type of light and one of those is to get up early or stay up late or shoot when the sun disappears behind a cloud.  Or perhaps shooting on a cloudy, overcast day or in the fog.  You can create your own shade but using the same deflector used to bounce spectacular light or you can carry an old white or muslin cloth and drape it over the area on a bright sunny day to diffuse the light.  Other than strong color saturation the other reason to consider using this light is to make better use of colors that blend together and produce nice soft color harmonies.
Notice how the light pink azalea flowers blend and harmonize with the light lavender of the iris with low contrast of the browns and greens, which are neutral colors?  In the next image, which is a soft focus of hepatica unfolding, notice how the light blue and green blend nicely and how the background is a bit deeper shade of the hepatica and serves to highlight the hepatica flowers?  This was accomplished by a double exposure whereby I opened up and didn't focus on any particular part of the image but just the color and then did a second exposure over the top of the individual flowers to achieve this nice color harmony because the background was a dreary blackish, brownish color which took away from the delicate flower blooms.

 As you head into the field this spring to photograph wildflowers, keep this light information in the back of your mind and unleash the creativity within you and experiment with exposures, light, and even composition. You might even end up with something spectacular.

Monday, March 17, 2014

Manipulating natural light for wildflowers

.
In the last post I describe the difference between spectacular and diffuse light and gave some examples of how spectacular light can be used to make the flower subject standout.  In this post I will demonstrate a simple technique that you can use to manipulate natural spectacular or diffuse light to make a subject standout and provide you with options for what lighting you think is best.  The technique I am discussing is nothing more than bouncing light with a reflector or some other shiny object and controlling the background with the use of shade, which can be created with a reflector as well.  Lets use the pink lady slipper orchid as the subject.  The first shot is with diffuse light and a large reflector was used to keep light off the background to darken it about 2 to 3 stops.
Note the even illumination and excellent color saturation of the flower and leaves.  This is a typical response when shooting under these conditions.  The use of the reflector shading the background helps the subject standout.
Now in the next image, a reflector was used after the sun came out from behind the clouds (early in the morning soft light) and illuminated the entire subject.  But how on earth did the flower get illuminated with spectacular light on the opposite side where the light came from?  A reflector was used to bounce the light back onto the flower.
In this case you will notice the good color saturation but the background, even though still darkened with a reflector hasn't gone completely dark and the subject is evenly illuminated with very faint shadows. You notice the sun is coming from the right side of the flower and lets see what it looks like when the spectacular light is placed behind the subject (and in this case a more close-up of just the flower).
The next image for comparison was taken with backlighting and the use of a reflector (and just a little different angle) which shows a more even illumination of the subject.

The final image was taken with just standard diffuse light and no use of reflectors at all.


Obviously all the images of the same flower or plant are quite different with respect to lighting and no one is better than the other.  Each person will respond differently to each different image.  They were obviously taken and posted (not in exact order taken) as when I first got to the site the flowers still had dew on them but by the time I left several hours later, the dew had evaporated but I still had nice early morning light.  As you go out to photograph wildflowers this spring keep this little tip in the back of your mind.  A reflector doesn't have to be an expensive piece of fabric from the photo store (I carry one that is translucent - usually for shading) and then a small one with a gold and a silver side for reflection to bounce the type of light I am looking for which gives me the option of gold, silver, or white with those reflectors) it can be a piece of aluminum foil, a beer can in the woods, a small mirror, or even something like a bright piece of paper.  Be creative and have fun.


Tuesday, March 11, 2014

Painting with Light

Light, in all its forms, is the most essential element that is required for photography.  Of course it is visible light for which allows us to see with the human eye as well.  Light is nothing more than electromagnetic wavelength visible to the human eye. The wavelength ranges from infrared to ultraviolet or about 400 to 700 nanometres. This electromagnetic wavelength is made up of photons, little energy packets causing changes in molecular bonding or chemistry allowing us to see.  As photographers we take light for granted, but we shouldn't for the more you know about and understand light, the better you are at harnessing it in a positive method to improve your images.We say that there are various sources of light, the sun, a flash, a lightbulb, etc. and we further say that light has a direction from which it emanates, in front of the subject, to the side of the subject, in back of the subject, from on top or on bottom.  Finally we refer to light and color in. terms of its temperature, warm versus cold (that is why you camera has different settings for different types of light as it relates to temperature), daylight versus overcast. etc.  Light and color also has a luminance (brightness) and a hue (color palette), and intensity (saturation).  The new digital cameras are designed to take advantage of all these various aspects of light, yet I am amazed at how individuals just get their camera out of the box and start shooting, without giving any thought to the light profiles saved in the camera for use in various situations.  We should and this post, the first of several on light, will hopefully demystify the concept of light and camera custom settings.

From a very practical standpoint for photography there are only two types of light, spectacular and diffuse.  Spectacular light emanates from a single source and is harsh, strong, pure and directional.  It often produces strong contrast with dark shadows. Human skin tones are usually never flattered using this light which is why you will see photographers using deflectors and other efforts to manipulate the subject when shooting outdoors in the middle of the day. This light can be harnessed effectively to make dramatic nature images or it can be a hindrance, such as the old adage of keeping the sun behind your shoulder when composing a photograph.  Because spectacular light is directional, you can take advantage of this property by taking some time to think about your subject and how it can be highlighted with spectacular light.  Everyone has probably heard of "Rembrandt" lighting where there is a rim of light behind that outlines the subject and provides a glow.  This type of light arises when the light source comes from behind the subject.  Very often however, another source of light is used as the primary light to evenly light the subject (usually diffuse light).  The point is that by moving around the subject you can create different effects by harnessing this type of light to make the subject standout from the background.

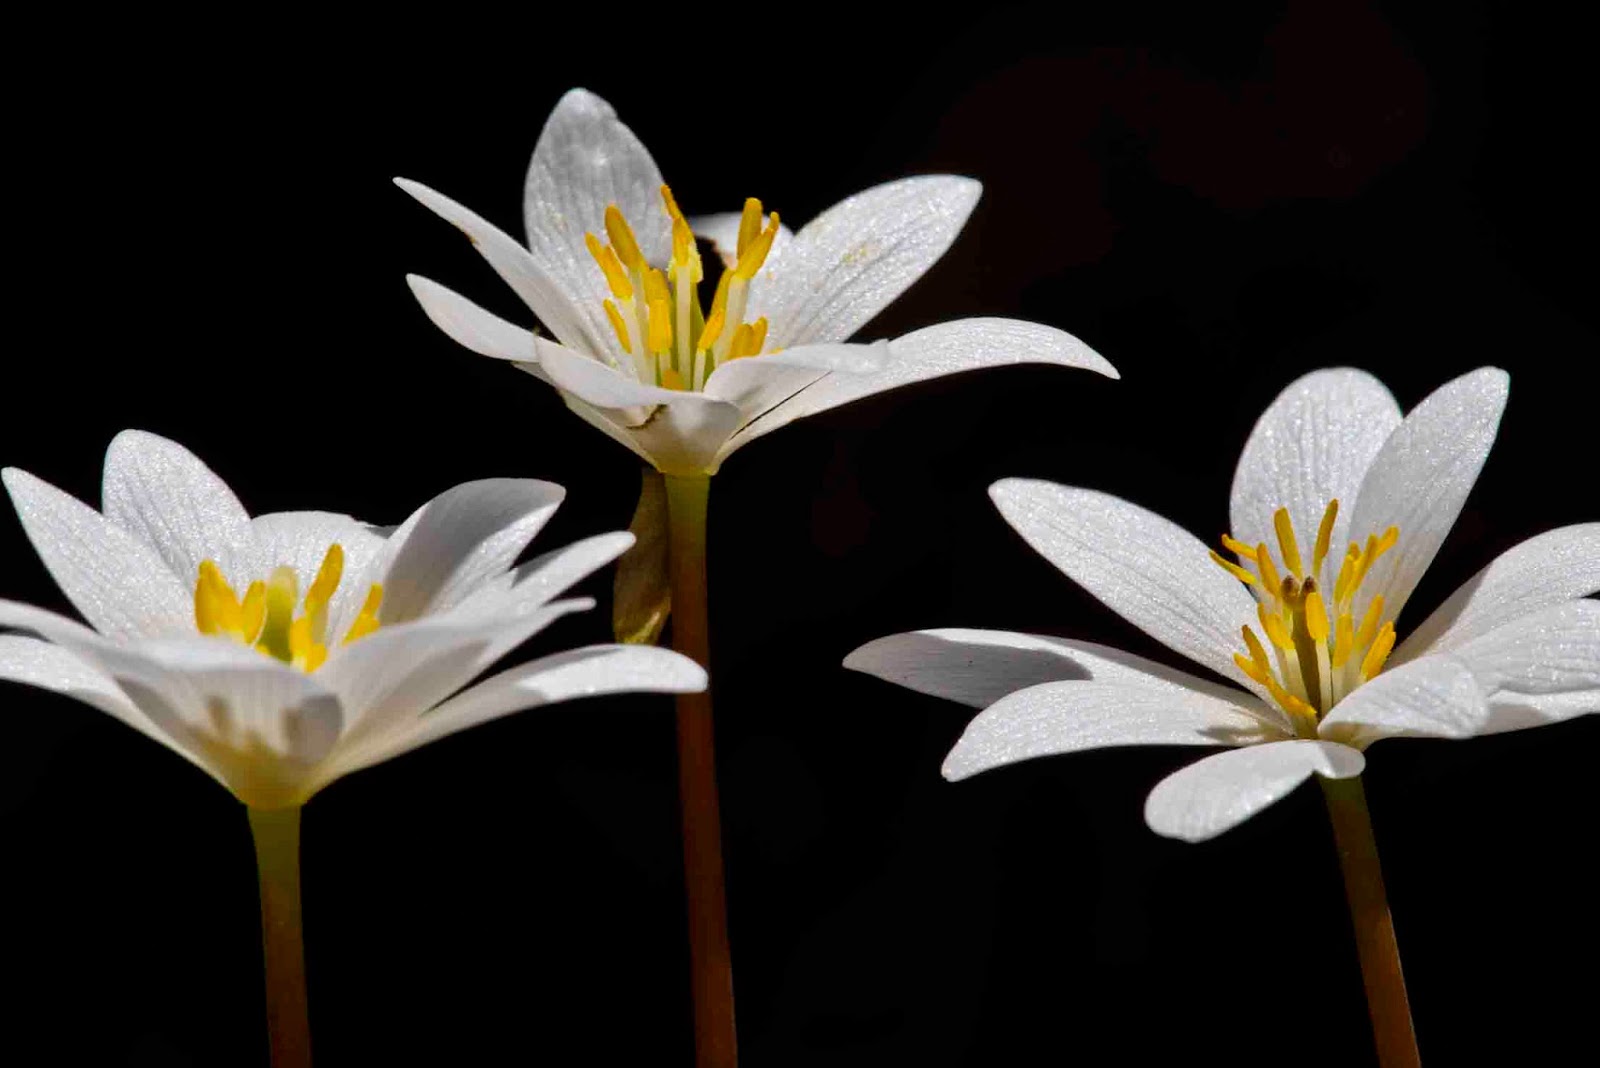
Since spring is just around the corner perhaps the best way to showcase this is by a flower example or two.  In the case of the bloodroot, the source of light comes from directly above the subject (this means lying on your belly looking upward) and you will notice the strong shadows on some of the petals.  You will also notice that there is a dark background because it is absent of direct light (and it is in the shade which is naturally darker than the surroundings - again as a result of strong spectacular light).  The lighting in this case serves to emphasize these flowers and nothing else. Also notice the high contrast of this image and the pure bright white and yellow colors (make sure you always balance the light to white which is easy in this case with these white petals).

The image of this hepatica is using the same technique and was taken the same day.  Note where the shadows arise.  In this case the lighting brings out the color of the flower but more importantly the hairs on the stem and sepals of those yet to open.  One key thing to remember when using this technique is to keep the source of light from hitting the front element of the lens.  A lens shade or hood is essential but in some cases you can still get lens flare and I have used my hand, a baseball cap, a leaf and a whole lot of other things to keep the light from hitting the front element.
Finally here is an image using the "Rembrandt" lighting with sandhill cranes whereby the light is creating this halo effect around the birds.
The next post we will begin to discover diffuse light, particularly with use on wildflowers.